Setting a static IP configuration in Linux

DHCP is very useful for temporary or guest devices within a network, however, when the devices are permanent or fixed it is convenient to set an IP address for each one that we will remember and thus we can always connect to it easily without having to find out what IP is assigned at that time.
Nowadays it is possible to establish static addresses through the router configuration, however, if we want to do it from the system itself it is also possible, for this we are going to edit the network configuration:
sudo nano /etc/network/interfaces
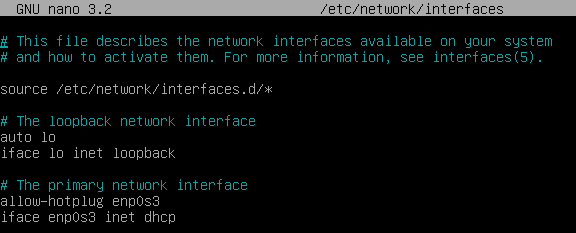
If we have never modified this file, we will find a file like the following, although depending on your computer the content will vary slightly:

It is important not to modify anything related to the loopback and if we have different network cards the one we want to configure, in my case is the one identified as enp0s3 (in older systems it is possible that they are identified as eth#), so we keep the first line and replace the line that begins with iface by the following:
iface enp0s3 inet static
address 192.168.1.5
netmask 255.255.255.255.0
gateway 192.168.1.1
dns-nameservers 8.8.8.8.8 8.8.4.4
With these configuration lines we set the IP address 192.168.1.5, the netmask, gateway and we also set the Google DNS servers, which have always given me better results than those provided by the different ISPs.
To save it, we only have to press simultaneously the keys Control + X and accept the saving of changes.
Keep in mind that this is an example, you have to adapt each line to your needs, if you do not know what parameters to use, you can check the ones provided by DHCP before making the changes with the following command:
sudo ifconfig
If the command does not work, it is due to the absence of net-tools on the system, you can install it with the following command:
sudo apt-get install net-tools


